Cat Eye Crimson Flame
- Unit price
- / per
Complete your manicure
Cat eye magnet 5 in 1
€9,95
- Unit price
- / per
€9,95
- Unit price
- / per
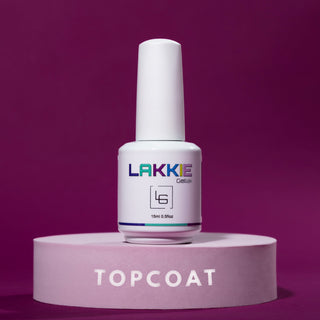
Gel Polish No Wipe Topcoat
€14,95
- Unit price
- / per
€14,95
- Unit price
- / per
Cat Eye Crimson Flame
- Unit price
- / per
Adding product to your cart
Complete your manicure
Cat eye magnet 5 in 1
€9,95
- Unit price
- / per
€9,95
- Unit price
- / per
Gel Polish No Wipe Topcoat
€14,95
- Unit price
- / per
€14,95
- Unit price
- / per
-
Color information:
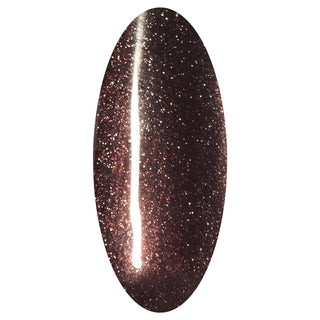
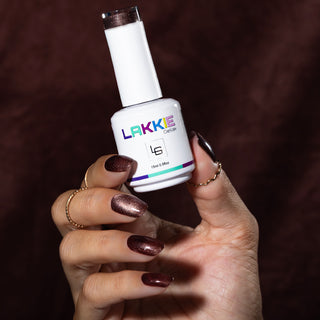
Cat Eye Crimson Flame is a stunning dark red cat eye gel polish with a red cat eye effect. Cat Eye Crimson Flame is a gel polish containing small metallic particles. After applying the gel polish (before curing), you can use a magnet to create various effects/patterns on the nail.
Description:
LAKKIE Gel Polish stays perfect for at least 2 weeks. You can use LAKKIE on natural nails or artificial nails. The gel polish also provides extra strength to natural nails, making them less prone to breaking or tearing. You use LAKKIE colors in combination with a (rubber) base coat and a (matte) top coat, and you cure them under a UV/LED lamp. It is a soak-off gel polish and is therefore easy to remove.
Want to know more about cat eye gel polish and how to apply it? read this blog
Check out: How LAKKIE works to see how you should apply and remove the gel polish.
Specifications:
HEMA and TPO Free
Color: Red
Feature: To be used with a magnet
Content: 15 ML
100% vegan and cruelty-free
-
Applying gel polish, what is the best way to do it?
Applying gel polish can take some time, but with the right steps and supplies, you can enjoy a beautiful manicure for longer. This guide will help you apply gel polish step by step to your own nails or someone else's. Make sure you have all the necessary materials at hand before you start. Let's get LAKKIE!
What is cat eye gel polish?
Cat eye gel polish is very similar to regular gel polish; the difference is that cat eye gel polish contains small pieces of metal. Sounds very complicated? It's actually quite simple. Because there are pieces of metal in the gel polish, you can create beautiful effects using a magnet.
What do you need?
- Top coat
Step 1: File your nails into the desired shape. Read more about different nail shapes here.
Step 2: Push back your cuticles using a cuticle pusher.
Step 3: Rough up the surface of your nails with a coarse nail file. You do this so the gel polish adheres better to your nail, allowing you to enjoy it for longer. Now clean your nails with a degreaser. Put a little degreaser or acetone on a nail wipe and thoroughly clean the edges as well. Ensure the nails are completely free of dust and lint.
Step 4: If you want even better adhesion, first apply nail prep to your nails. Let it air dry for 30 seconds. (Nail prep is optional)
Start with a base coat. This can be a regular base coat, a rubber base coat, a covering rubber base coat, or possibly a BIAB application. Apply a layer and be sure to keep about 1 mm away from your cuticles. If you want the layer to fit more neatly against the cuticles, use a thin brush, but make sure the gel polish does not come into contact with your skin. While applying the base coat (and subsequent layers), be sure to cover the free edge well. We call this sealing the nail. This prevents air from getting under the gel polish, which also makes it stay on much better. An important step, therefore. Then, let this layer cure under the UV/LED lamp.
Step 5: Now apply a thin layer of the cat eye gel polish. Keep the distance from the cuticles in mind again and make sure you seal the free edge well. Then, let this layer cure under the nail lamp.
Now comes the most important step, the step where you will use the magnet to create the cat eye effect. Apply another layer of cat eye gel polish and do not cure this layer yet. Now hold the magnet over the nail for about 5 seconds until you have the desired effect. Then cure the layer under the lamp. Do this nail by nail.
Make sure to seal the free edge well here with every layer as well. Then, let this layer cure under the nail lamp again. Repeat this step until you have the perfect coverage. Note that you should apply really thin layers, rather than very thick ones. Thick layers of gel polish often look bad quickly and can start to wrinkle—a waste of all the work you put into it.
Step 6: Are you satisfied with the result? Then apply the no-wipe top coat and let this layer of gel polish cure under the UV/LED lamp as well. This can, of course, be a glossy top coat, but also a matte top coat.
Step 7: And finally, care for your cuticles with some cuticle oil. You can easily go around the nail with the brush to apply the oil. After applying it to every finger, massage the oil in well so that it penetrates properly. It is best to apply cuticle oil twice a day.
Wasn't that bad, right? And don't forget, practice makes perfect!
-
Removing gel polish, what is the best way to do it?
Removing gel polish from your nails is always a tedious chore, but be sure to take your time and do it carefully. If you are too rough or do not take enough time, there is a high chance that your nails will be damaged, resulting in thin, brittle, and easily breaking nails. Read the following steps carefully before you remove the gel polish from your nails.
Step 1 of removing gel polish is to file off the top coat with a coarse nail file. This is an important step, because it allows the acetone to penetrate the gel polish better.
Once you have filed off the top coat, it is important to protect your cuticles. The acetone will dry them out quickly, so use some cuticle oil before wrapping your fingers. No cuticle oil at home? Then apply some Vaseline to your cuticles.
To remove gel polish, it is important to use acetone or gel polish remover. Regular nail polish remover is not strong enough to remove gel polish. Soak a cotton pad or a nail wipe completely with acetone. Then place it on your nail and wrap your finger with aluminum foil. Apply this step to every nail. Let this soak for at least 15 minutes.
After 15 minutes, remove the foils with a twisting motion. You will see that the gel polish is starting to loosen.
Now you can gently push the gel polish off the nail with a cuticle pusher. Be careful with this step to prevent damage to your nails! Are you unable to remove it easily? Do not use force to remove the gel polish, but repeat the previous steps. Soak another cotton pad or nail wipe with acetone and place it on your nail. Then wrap your nail with aluminum foil again and let it soak for 15 minutes.
When everything is removed, you can trim/file your nails to the desired length and shape. Don't feel like a new color yet? You can also choose to use a layer of (covering) rubber base to reduce the chance of your nails breaking or tearing.
And finally, don't forget to nourish your nails with cuticle oil. Using acetone dries out your cuticles. By massaging your cuticles with oil, you ensure proper hydration and they will recover quickly.
-
All Gel Polish colors are HEMA and TPO free.
Ingredients: Acrylated aliphatic urethane, Acrylates Copolymer, [bis(4-methylphenyl)phosphinyl](2,4,6-trimethylphenyl), Dimethicone, Microcrystalline wax, CI 77499, CI 77891, CI 14700
-
Do I need to use a base coat under gel polish?
Yes, always. Otherwise, the gel polish color will not adhere to your nails.How long does gel polish last?
On average, gel polish stays looking good for 2 weeks, depending on your nail growth, how you treat them, and the condition of your nails.Do I need a nail prep for gel polish?
That depends on your nail type. For oilier nails, it is recommended to use a nail prep for extra adhesion.What should you pay attention to with gel polish?
It is important that you do not apply your nail polish in direct sunlight (not even near a window), as this can cause the gel polish to cure, including the contents of the bottle. Also, close the bottle or keep it away when you are curing your nails under the UV/LED lamp. This can also cause the contents of your bottle/brush to cure, making the product unusable.
Can you use gel polish without a nail lamp?
No, the gel products from LAKKIE all need to be cured under a UV/LED nail lamp.
Color information:
Cat Eye Crimson Flame is a stunning dark red cat eye gel polish with a red cat eye effect. Cat Eye Crimson Flame is a gel polish containing small metallic particles. After applying the gel polish (before curing), you can use a magnet to create various effects/patterns on the nail.
Description:
LAKKIE Gel Polish stays perfect for at least 2 weeks. You can use LAKKIE on natural nails or artificial nails. The gel polish also provides extra strength to natural nails, making them less prone to breaking or tearing. You use LAKKIE colors in combination with a (rubber) base coat and a (matte) top coat, and you cure them under a UV/LED lamp. It is a soak-off gel polish and is therefore easy to remove.
Want to know more about cat eye gel polish and how to apply it? read this blog
Check out: How LAKKIE works to see how you should apply and remove the gel polish.
Specifications:
HEMA and TPO Free
Color: Red
Feature: To be used with a magnet
Content: 15 ML
100% vegan and cruelty-free
Applying gel polish, what is the best way to do it?
Applying gel polish can take some time, but with the right steps and supplies, you can enjoy a beautiful manicure for longer. This guide will help you apply gel polish step by step to your own nails or someone else's. Make sure you have all the necessary materials at hand before you start. Let's get LAKKIE!
What is cat eye gel polish?
Cat eye gel polish is very similar to regular gel polish; the difference is that cat eye gel polish contains small pieces of metal. Sounds very complicated? It's actually quite simple. Because there are pieces of metal in the gel polish, you can create beautiful effects using a magnet.
What do you need?
- Top coat
Step 1: File your nails into the desired shape. Read more about different nail shapes here.
Step 2: Push back your cuticles using a cuticle pusher.
Step 3: Rough up the surface of your nails with a coarse nail file. You do this so the gel polish adheres better to your nail, allowing you to enjoy it for longer. Now clean your nails with a degreaser. Put a little degreaser or acetone on a nail wipe and thoroughly clean the edges as well. Ensure the nails are completely free of dust and lint.
Step 4: If you want even better adhesion, first apply nail prep to your nails. Let it air dry for 30 seconds. (Nail prep is optional)
Start with a base coat. This can be a regular base coat, a rubber base coat, a covering rubber base coat, or possibly a BIAB application. Apply a layer and be sure to keep about 1 mm away from your cuticles. If you want the layer to fit more neatly against the cuticles, use a thin brush, but make sure the gel polish does not come into contact with your skin. While applying the base coat (and subsequent layers), be sure to cover the free edge well. We call this sealing the nail. This prevents air from getting under the gel polish, which also makes it stay on much better. An important step, therefore. Then, let this layer cure under the UV/LED lamp.
Step 5: Now apply a thin layer of the cat eye gel polish. Keep the distance from the cuticles in mind again and make sure you seal the free edge well. Then, let this layer cure under the nail lamp.
Now comes the most important step, the step where you will use the magnet to create the cat eye effect. Apply another layer of cat eye gel polish and do not cure this layer yet. Now hold the magnet over the nail for about 5 seconds until you have the desired effect. Then cure the layer under the lamp. Do this nail by nail.
Make sure to seal the free edge well here with every layer as well. Then, let this layer cure under the nail lamp again. Repeat this step until you have the perfect coverage. Note that you should apply really thin layers, rather than very thick ones. Thick layers of gel polish often look bad quickly and can start to wrinkle—a waste of all the work you put into it.
Step 6: Are you satisfied with the result? Then apply the no-wipe top coat and let this layer of gel polish cure under the UV/LED lamp as well. This can, of course, be a glossy top coat, but also a matte top coat.
Step 7: And finally, care for your cuticles with some cuticle oil. You can easily go around the nail with the brush to apply the oil. After applying it to every finger, massage the oil in well so that it penetrates properly. It is best to apply cuticle oil twice a day.
Wasn't that bad, right? And don't forget, practice makes perfect!
Removing gel polish, what is the best way to do it?
Removing gel polish from your nails is always a tedious chore, but be sure to take your time and do it carefully. If you are too rough or do not take enough time, there is a high chance that your nails will be damaged, resulting in thin, brittle, and easily breaking nails. Read the following steps carefully before you remove the gel polish from your nails.
Step 1 of removing gel polish is to file off the top coat with a coarse nail file. This is an important step, because it allows the acetone to penetrate the gel polish better.
Once you have filed off the top coat, it is important to protect your cuticles. The acetone will dry them out quickly, so use some cuticle oil before wrapping your fingers. No cuticle oil at home? Then apply some Vaseline to your cuticles.
To remove gel polish, it is important to use acetone or gel polish remover. Regular nail polish remover is not strong enough to remove gel polish. Soak a cotton pad or a nail wipe completely with acetone. Then place it on your nail and wrap your finger with aluminum foil. Apply this step to every nail. Let this soak for at least 15 minutes.
After 15 minutes, remove the foils with a twisting motion. You will see that the gel polish is starting to loosen.
Now you can gently push the gel polish off the nail with a cuticle pusher. Be careful with this step to prevent damage to your nails! Are you unable to remove it easily? Do not use force to remove the gel polish, but repeat the previous steps. Soak another cotton pad or nail wipe with acetone and place it on your nail. Then wrap your nail with aluminum foil again and let it soak for 15 minutes.
When everything is removed, you can trim/file your nails to the desired length and shape. Don't feel like a new color yet? You can also choose to use a layer of (covering) rubber base to reduce the chance of your nails breaking or tearing.
And finally, don't forget to nourish your nails with cuticle oil. Using acetone dries out your cuticles. By massaging your cuticles with oil, you ensure proper hydration and they will recover quickly.
All Gel Polish colors are HEMA and TPO free.
Ingredients: Acrylated aliphatic urethane, Acrylates Copolymer, [bis(4-methylphenyl)phosphinyl](2,4,6-trimethylphenyl), Dimethicone, Microcrystalline wax, CI 77499, CI 77891, CI 14700
Do I need to use a base coat under gel polish?
Yes, always. Otherwise, the gel polish color will not adhere to your nails.
How long does gel polish last?
On average, gel polish stays looking good for 2 weeks, depending on your nail growth, how you treat them, and the condition of your nails.
Do I need a nail prep for gel polish?
That depends on your nail type. For oilier nails, it is recommended to use a nail prep for extra adhesion.
What should you pay attention to with gel polish?
It is important that you do not apply your nail polish in direct sunlight (not even near a window), as this can cause the gel polish to cure, including the contents of the bottle. Also, close the bottle or keep it away when you are curing your nails under the UV/LED lamp. This can also cause the contents of your bottle/brush to cure, making the product unusable.
Can you use gel polish without a nail lamp?
No, the gel products from LAKKIE all need to be cured under a UV/LED nail lamp.
Have you seen these cat eye colors yet?
Cat Eye Autumn Spell
€14,95
- Unit price
- / per
€14,95
- Unit price
- / per
Cat Eye Irresistible Confidence
€14,95
- Unit price
- / per
€14,95
- Unit price
- / per
Cat Eye Inner Magnetism
€14,95
- Unit price
- / per
€14,95
- Unit price
- / per
Cat Eye Majestic Illusion
€14,95
- Unit price
- / per
€14,95
- Unit price
- / per
Cat Eye Mystical Midnight
€14,95
- Unit price
- / per
€14,95
- Unit price
- / per
Cat Eye Cherished Radiance
€14,95
- Unit price
- / per
€14,95
- Unit price
- / per
Cat Eye Effortless Charm
€14,95
- Unit price
- / per
€14,95
- Unit price
- / per
Laten we gaan voor een herfstgloed!
Regular price
€104,65
€90,00
Sale
- Unit price
- / per
Regular price
€104,65
€90,00
Sale
- Unit price
- / per
Cat Eye Crimson Flame
€14,95
- Unit price
- / per
€14,95
- Unit price
- / per
Cat Eye Smokey Soirée
€14,95
- Unit price
- / per
€14,95
- Unit price
- / per